Jump to How to Remove Files from the Dashboard.
NOTE: Before uploading files, make sure you have created your document and that you are uploading your files to the correct document.

1. Click the ‘UPLOAD FILES’ button in the desired document

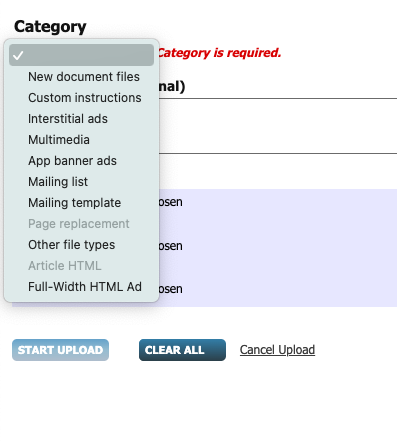
2. Select the file category
Upload categories:
New document files – only used when uploading the initial pdf files for processing.
NOTE: This option will be greyed out once the Start Conversion button is selected. If you need to insert or replace any pdfs after the Start Conversion button has been selected, you will want to use the Page Replacement category.
Custom Instructions – upload to this category if you have any custom instructions (linking or specific production requests) needed to process the document.
Multimedia – this category should be selected if you are uploading videos, blow-ins, or advertisement for the digital edition.
NOTE: Make sure to select Yes or No if assistance needed to place your files. Multimedia placements can incur a Support Services Fee if GTxcel is placing them for you.
App Banner Ads – this category should be used when uploading banner advertisements for the Legacy App.
Mailing/Subscriber Lists – select this category when uploading your mailing/subscriber lists for a mailing deployment or to load your subscribers for access to the document.
Mailing Template – select this category when uploading anything for the email notification (features, images, advertisements, etc).
Page Replacement – any page inserts or replacements should be uploaded to this category. Page replacements/insert may incur a fee, be sure to upload ALL pages at once as to not incur multiple fees.
Article HTML – use this category to upload your own HTML articles into the Article Editor.
Other File Types – this category should only be used for files that do not belong under another category or your Customer Success Manager has asked you to.
3. Select your files to upload

NOTE: Please upload all files that apply to the selected category at once. You can either upload each file separately or compress all files into a zip file.
4. Add any special instructions
If applicable, include your instructions to help the GTxcel team process your uploaded files.

5. Upload your files
After you’ve verified your selections, click “START UPLOAD.” Be sure to keep your browser window open until the upload completes.
NOTE: Uploading to the New Document Files or Mailing/Subscriber Lists categories, there will be an approval screen that appears after you Start Upload.
Removing Files
To remove files go into the “FILES FOR DOCUMENT” section, select the tab for the category you uploaded your file under. Click on the file you would like to remove, and then select the “DELETE FILES” button in the bottom right corner. Please be sure not to remove files that have already been processed by GTxcel.


 Contact Support