
What is on this page?
Uploading Multimedia
Placing and Editing Multimedia
Deleting Multimedia
Navigation:
Multimedia Tab – allows you to add multimedia to your Page View.

Actions:
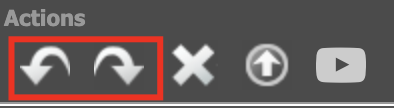
Undo/Redo – undo or redo an edit.
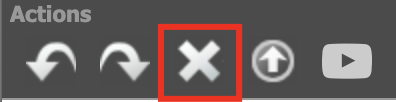
Delete – delete placed multimedia.
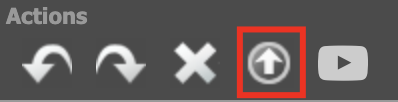
Upload – upload the multimedia that you would like to place.
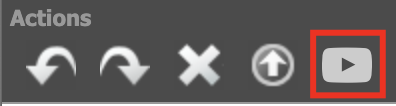
Video Link – place a video from a third party video platform (YouTube, Vimeo, JW Player, etc.)
Uploading Multimedia
There are two ways to upload your multimedia:
Option 1: Using the upload button in the Page Editor
BENEFITS:
– Ready to place immediately within the same Page Editor session
- Open the Page Editor
- Navigate to the Multimedia tab
- Click on the Upload Media Files button
- Select your files (multiple files can be uploaded at once)
- Click on the START UPLOAD button
Option 2: From the UPLOAD FILES button in the Publisher Dashboard
BENEFITS:
-Able to upload before the issue has been processed or while the issue is in production
-Able to request assistance with placing your multimedia (could incur a fee)
- Click on the UPLOAD FILES button for the issue you would like to place the multimedia on
- From the dropdown, choose the Multimedia category
- Select if assistance is needed or not
- Yes, per instructions below (this option could incur a Professional Services fee)
- Make sure to add instructions for placement (where each file should be placed, URLs they should be linked to, etc.)
- No, I will place them myself with the Page Editor
- Yes, per instructions below (this option could incur a Professional Services fee)
- Select your files (multiple files can be uploaded at once)
- If you have selected ‘Yes’ for needing assistance to place your files, please make sure to upload ALL files at once.
- Click START UPLOAD
NOTE: If you have selected ‘Yes’ for needing assistance to place your files, your Customer Success Team will receive a notification and will inform you once your multimedia has been placed.
Placing and Editing Multimedia
Types of Multimedia that can be placed through the Page Editor are:
Pop-ups
Image file types supported are GIF, JPG, PNG.
- Open the Page Editor
- Navigate to the Multimedia tab
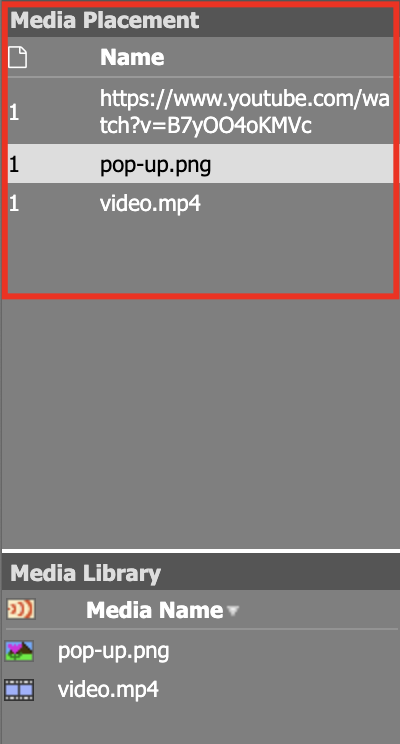
3. The files that you have uploaded will appear in the Media Library
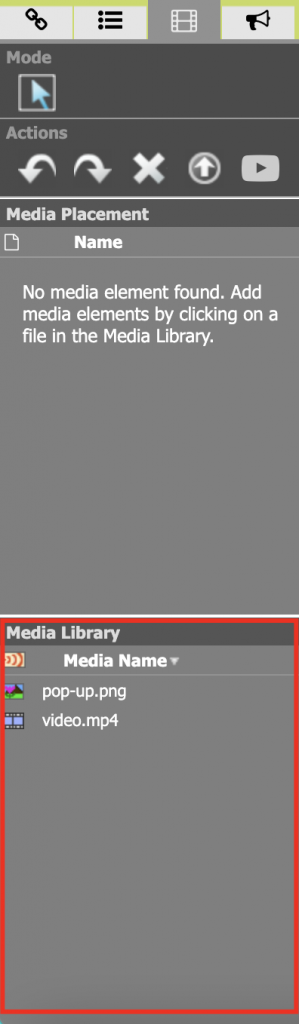
4. Click on the GIF, JPG or PNG file that you would like to place, this will add it to the Media Placement section as well as on the page that you are currently on.
5. Clicking on the file will also bring up the Image Properties on the right hand side of the screen:
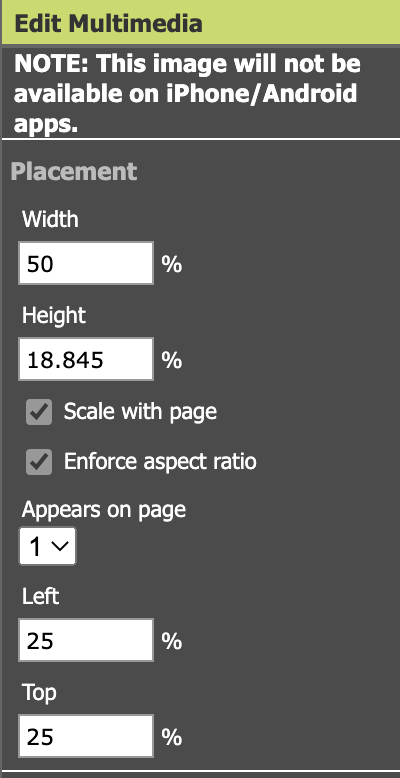
Placement
- Width and Height can be set in the Image Properties OR you can resize the image directly on the page by dragging and dropping the corners/sides.
- Scale with page and Enforce aspect ratio are both defaulted on but can be unchecked at any time.
- The Appears on page dropdown gives you the option to move the pop-up to another page.
- The Left and Top options control the padding from the left side and top of the page. You can also click on the image itself and drag it to the desired position.
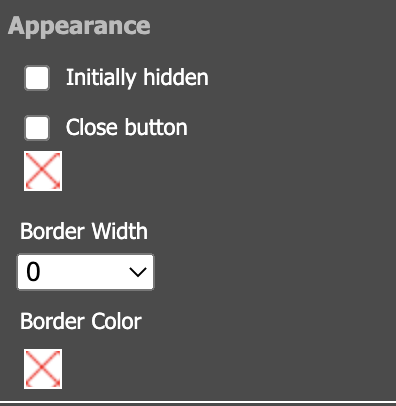
Appearance
- Initially hidden is used for the Reverse Pop-up option
- Close button will add a close button on the top right of the image
- You also have the option to select the color of the close out button
- Border Width gives you the ability to add a border to your pop-up
- Border Color gives you color option for the border
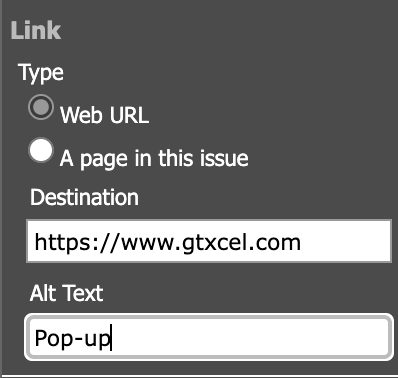
Link
The Type of link options are:
- Web URL
- Destination is where the FULL web URL should be inputted
- The Alt Text should be a brief description of the image. This will allow readers using a screenreader to know what the image is being shown.
- A page in this issue
- Destination is a dropdown of all pages in the document, select the page you would like the pop-up to link to.
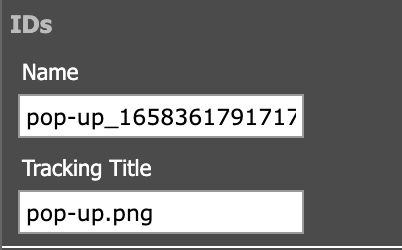
IDs
- Name will be automatically generated but you have the ability to edit it if needed.
- Tracking Title will also be automatically generated using the file name. You have the ability to change this as well. Keep in mind that this is how the pop-up will appear in your Analytics Dashboard.
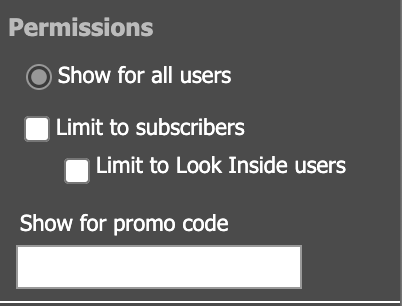
Permissions
- Show for all users is the default permission, this means that the pop-up will appear for ALL readers.
- For closed access collections, you have the option to limit who sees the pop-up.
- Limit to subscribers sets it so that only logged in subscribers can see the pop-up.
- Limit to Look Inside users sets it to only appear for non-subscribers or subscribers who are not logged in.
- Show for promo code will require a specific URL in order for the pop-up to appear.
- For example: If you would like to send an email out to all subscribers with expiring subscriptions, you could add the word ‘expired’ to this field. The URL to use would then be something like https://www.domain.com/collection/document_name?sub_id=@{sub_id}@&u1=expired
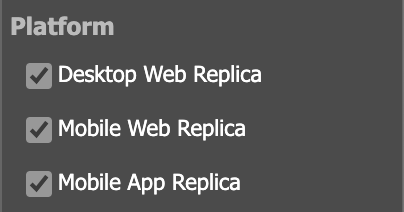
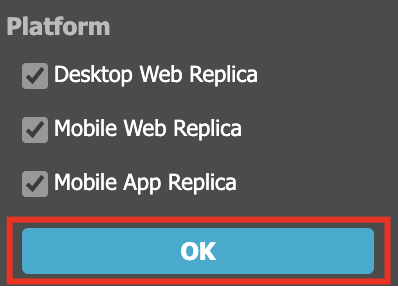
Platform
- Desktop, Mobile and Mobile App are all checked by default but you have the ability to choose which platforms you do or do not want the pop-up to appear on.
6. Click the OK button to save all of your settings. Use the Preview button on the top navbar to be sure it looks and functions as desired.
Video and Audio files
Video file types supported are MOV, WMV, AVI, FLV, F4V, MPG, MP4, M4V.
Audio file types supported are WAV, MP3, M4A.
- Open the Page Editor
- Navigate to the Multimedia tab
3. The files that you have uploaded will appear in the Media Library
4. Click on the file that you would like to place, this will add it to the Media Placement section as well as on the page that you are currently on.
5. Clicking on the file will also bring up the Media Properties on the right hand side of the screen:
Placement
- Width and Height can be set in the Image Properties OR you can resize the image directly on the page by dragging and dropping the corners/sides.
- Scale with page and Enforce aspect ratio are both defaulted on but can be unchecked at any time.
- The Appears on page dropdown gives you the option to move the pop-up to another page.
- The Left and Top options control the padding from the left side and top of the page. You can also click on the image itself and drag it to the desired position.
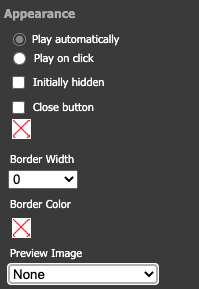
Appearance
- Play options
- Play Automatically – the video or audio file will start playing as soon as a reader lands on the page.
- Play on click – requires the reader to click play.
- Initially hidden is used for the Reverse Pop-up option
- Close button will add a close button on the top right of the image
- You also have the option to select the color of the close out button
- Border Width gives you the ability to add a border to your pop-up
- Border Color gives you color option for the border
- Preview Image – you have the option to add a preview image which will appear before the play button is clicked. Upload the image as you would any other image file and select it from the dropdown.
Link
The Type of link options are:
- Web URL
- Destination is where the FULL web URL should be inputted
- The Alt Text should be a brief description of the image. This will allow readers using a screenreader to know what the image is being shown.
- A page in this issue
- Destination is a dropdown of all pages in the document, select the page you would like the pop-up to link to.
IDs
- Name will be automatically generated but you have the ability to edit it if needed.
- Tracking Title will also be automatically generated using the file name. You have the ability to change this as well. Keep in mind that this is how the pop-up will appear in your Analytics Dashboard.
Permissions
- Show for all users is the default permission, this means that the pop-up will appear for ALL readers.
- For closed access collections, you have the option to limit who sees the pop-up.
- Limit to subscribers sets it so that only logged in subscribers can see the pop-up.
- Limit to Look Inside users sets it to only appear for non-subscribers or subscribers who are not logged in.
- Show for promo code will require a specific URL in order for the pop-up to appear.
- For example: If you would like to send an email out to all subscribers with expiring subscriptions, you could add the word ‘expired’ to this field. The URL to use would then be something like https://www.domain.com/collection/document_name?sub_id=@{sub_id}@&u1=expired
Platform
- Desktop, Mobile and Mobile App are all checked by default but you have the ability to choose which platforms you do or do not want the pop-up to appear on.
6. Click the OK button to save all of your settings. Use the Preview button on the top navbar to be sure it looks and functions as desired.
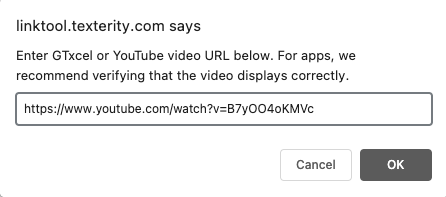
YouTube, Vimeo, and other 3rd party video servers
- Open the Page Editor
- Navigate to the Multimedia tab
3. Click on the Add Media Link button

4. Paste the URL for the video you would like to place and hit OK
5. The Media Properties on the right hand side of the screen are now available to you.
Placement
- Width and Height can be set in the Image Properties OR you can resize the image directly on the page by dragging and dropping the corners/sides.
- Scale with page and Enforce aspect ratio are both defaulted on but can be unchecked at any time.
- The Appears on page dropdown gives you the option to move the pop-up to another page.
- The Left and Top options control the padding from the left side and top of the page. You can also click on the image itself and drag it to the desired position.

Appearance
- Play options
- Play Automatically – the video or audio file will start playing as soon as a reader lands on the page.
- Play on click – requires the reader to click play.
- Initially hidden is used for the Reverse Pop-up option
- Close button will add a close button on the top right of the image
- You also have the option to select the color of the close out button
- Border Width gives you the ability to add a border to your pop-up
- Border Color gives you color option for the border
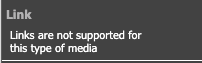
Link
Linking for this type on media is not available, the video will automatically link to the video on the 3rd party servers site.
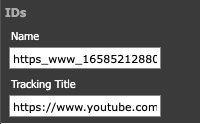
IDs
- Name will be automatically generated but you have the ability to edit it if needed.
- Tracking Title will also be automatically generated using the file name. You have the ability to change this as well. Keep in mind that this is how the pop-up will appear in your Analytics Dashboard.
Permissions
- Show for all users is the default permission, this means that the pop-up will appear for ALL readers.
- For closed access collections, you have the option to limit who sees the pop-up.
- Limit to subscribers sets it so that only logged in subscribers can see the pop-up.
- Limit to Look Inside users sets it to only appear for non-subscribers or subscribers who are not logged in.
- Show for promo code will require a specific URL in order for the pop-up to appear.
- For example: If you would like to send an email out to all subscribers with expiring subscriptions, you could add the word ‘expired’ to this field. The URL to use would then be something like https://www.domain.com/collection/document_name?sub_id=@{sub_id}@&u1=expired
Platform
- Desktop, Mobile and Mobile App are all checked by default but you have the ability to choose which platforms you do or do not want the pop-up to appear on.
6. Click the OK button to save all of your settings. Use the Preview button on the top navbar to be sure it looks and functions as desired.
Reverse Pop-ups
A reverse pop-up is initially hidden when landing on the replica page and only appears once a hotspot is clicked on. A reverse pop-up can be an image, video or audio file.
Since the pop-up is initially hidden when the page displays, we recommend including a call to action in your PDF design which can then be set with a link to display the pop-up. For example, an icon or text that reads “Click here to Watch.”
- Follow the placement steps depending on what kind of file you are placing.
- GIF, JPG or PNG
- MP4 or Audio file
- Video hosted on video server (YouTub, Vimeo, etc.)
- JW Player video
2. Once your multimedia is placed and you have the image properties open on the right hand side. Navigate to the “Appearance” section and check off the “Initially Hidden” box.

3. Find the media element name by navigating to the “IDs” section, find the field labeled “Name.” This value is automatically generated upon upload. Copy this value.
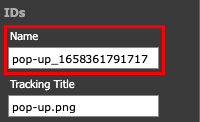
Note: The “Name” value is only visible in the Page Editor, not to end users or for tracking, and may be changed if desired. The only caveat for renaming is to make sure the value is unique within the document. (“Tracking Title” is used for analytics, and will match the name of the file, by default.)
4. Create the link/hotspot to trigger the pop-up. Now you’ll need to create a link with a javascript function on the page to unhide the media element. Make sure you have copied or noted the media element’s name per step 3, and then click on the link tab (upper left corner).

Use the instructions for creating a new link where your call to action is on the page. Once you have selected the hotspot set the Link Type to “web URL” and then place the following javascript in the “Destination” field:
javascript:openPopup('[element name]')
Replace the [element name] with the media element’s name value that you copied from the previous step (pop-up_1658361791717). In the example we’re using, the full javascript function is:
javascript:openPopup('pop-up_1658361791717')

Note: this function is case sensitive, so if it doesn’t work check that you’ve typed it correctly.
NOTE: In the “Mouseover Text” field you may enter custom text such as “Watch Video” to avoid the default behavior, which is to display the javascript function when a reader hovers over the link.
Deleting Multimedia
- Select the multimedia you would like to delete in the Media Placement box.
2. Click on the X icon to delete the selected multimedia.
NOTE: Deleting placed multimedia will only remove it from the document. The uploaded file will still remain in the Media Library if needed at a later time.
 Contact Support